Contents
- Introduction
- Installing the add-in
- Initial Set Up
- Performance
- Add a Portfolio
- Add a Product
- Formulas
- Help and Support
Introduction
Sparta's Excel plugin for Live Curves allows users to export portfolios and products directly to Excel, with live updates, allowing you to integrate and manipulate our data with your own worksheets, cross reference with other data, and make links with your own models.
The Sparta Excel Plugin is available for:
- Excel 365 on Windows (Microsoft 365)
*Note: Excel for Mac not supported
*Note: Online versions of Excel not supported
Installing the add-in
*Note: Please ensure that all instances of Excel are closed before installing the Sparta for Excel Add-in
Please click this link to download the Sparta for Excel Add-in from the Microsoft store. The following window will open in your default web browser.
Click on ‘Get it now’
 Once 'Get it now' has been clicked, you will be redirected to the following page.
Click on ‘Open in Excel’
 A pop-up will appear at the top of your web browser window.
Click on ‘Open Excel’

Microsoft Excel will open automatically, and the ‘Sparta for Excel’ tab will now appear in your Excel instance. The Sparta for Excel Add-in has now been successfully installed, please continue to the initial setup below.
Initial Set Up
Once the plugin is installed, a ‘Sparta’ tab should appear in your Excel.
Click on the ‘Sparta for Excel’ Tab and then click on ‘Start’

The main navigation pane will then appear to the right of your workbook. You will then be asked to log in using your Sparta credentials.

In order to use the Sparta for Excel Add-in, you will need to accept our terms of use.
 Scroll down to read the terms of use.

You have now successfully completed the initial setup for the Sparta for Excel Add-in, please continue to the performance section below

Performance
We have added the ability to increase or decrease the update frequency as required to improve performance and system stability. We have set the Recommended – Update frequency every 2 seconds option as default to ensure maximum compatibility.
- Live – This option updates data in real-time.
- Recommended – The update frequency for this option is every 2 seconds. We recommend this option for standard sheets.
- Idle – The update frequency for this option is every 5 seconds. We recommend this option when running large data models or multiple add-ins.
- Pause – This option pauses the data connection between Excel and Sparta completely. Select Live, Recommended, or Idle to resume the data connection.

Please continue to the add a portfolio section below
Add a Portfolio
Once logged in, your will be presented with the 'Add Portfolio' menu.
Select the portfolio or portfolios you wish to add
Click ‘Add’
The selected portfolio will now import from Sparta. It will appear in a new tab:

Add a Product
Navigate to the ‘Add Products’ button in the main navigation pane.

The menu panel on the right will now show you a selection of individual products you can now add to the sheet.

In order to add a product to the sheet, highlight the relevant column, tick the required products then click ‘Add’.

Please note that the data will enter the workbook at the selected cell (for example, if you were to select cell L16 in the example below, the data would begin from cell L16, and will not automatically fit into the selected column).
Add a Product and Include Month Column
The plugin allows users to import an individual product with month columns attached (should you need to start a new worksheet, or you need to place the product in a different table within the same worksheet).
To do this, click the 'Month Column' slider to the on position, select your product(s) and highlight the cell where you would like to place the data.

Click 'Add'
The data will then be added to the sheet with the corresponding month index alongside it.

Formulas
The Sparta Excel plugin uses formulas to download data:
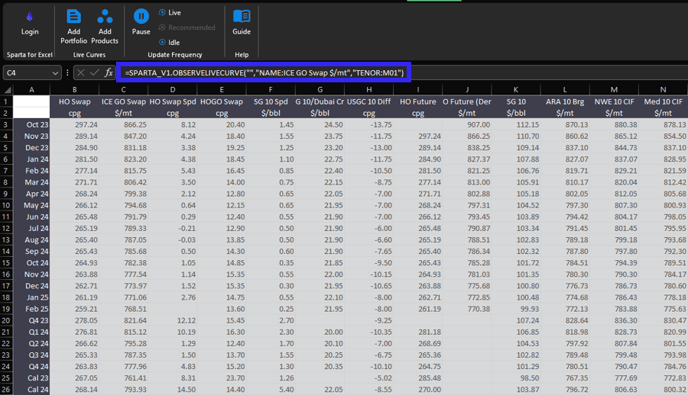
The formula is composed of the following parts:

It is possible to get the forward price of a product for a particular month directly using the formula. The Function part of the formula is fixed and is always needed to get the forward price. The “Product name” and “Tenor” parameters can be modified to get the product desired.
-
NAME: name of the product + unit. I.e.: “ICE GO Swap $/mt”.
-
TENOR: Contract month. BOM is the current month, M01 is the current month + 1, etc.
The headers are also obtained using formulas. This way, Sparta will always keep the information for the products and months updated. These are the formulas used to get the headers:
-
“Product name” header: It is possible to modify the “Product name” parameter to get the name of the product.

-
“Units” header: It is possible to modify the “Product name” parameter to get the units of the product.

-
“Month contract” header: It is possible to modify the “Month” parameter to get the name of the month. The possible values are “BOM” for the current month, “M01” for the current month + 1, etc.

Help and Support
Quick Guide
We have added a quick guide inside the Sparta for Excel add-in; simply click on one of the quick guide buttons and reference the sections below.

Click on Portfolios to access the “How to add a portfolio” section of the quick guide.
 Click on Products to access the “How to add products” section of the quick guide.

Click on Formulas to access the “How to work with formulas” section of the quick guide.
 Click on Performance to access the “How to change the frequency of updates” section of the quick guide.

Updating the Sparta for Excel Add-in
When an update is available for the add-in, a pop-up will appear in the right menu panel. Click "Update now", and the Sparta for Excel add-in will be updated to the latest version.

Remove the Sparta for Excel Add-in
To remove the Sparta for Excel add-in from your Excel instance, please log out of the add-in, and click on the "Home" tab in the main ribbon menu and then click on Add-ins.

Click on “Get Add-ins”

Click on “MY ADD-INS”, hover over the Sparta for Excel add-in and click the three horizontal dots.
*Note: If you are unable to see the three horizontal dots, your Excel instance may be managed by your organisation, please contact your IT department for assistance.
Click on “Remove”
 When the below dialogue box appears, click on “Remove” again.

The Sparta for Excel add-in will now be removed from your Excel instance.
*Warning: Running large data models or multiple add-ins could lead to performance degradation or system instability.
If you require our assistance in setting up, using or explaining the Excel Add-in, please do not hesitate to contact the customer success team at success@spartacommodities.com.